|
MrWhy.com » Videos » Photoshop: Creating An Authentic Lomo Effect In 5 Steps |
|
|
Photoshop: Creating An Authentic Lomo Effect In 5 Steps
|
Photoshop: Creating An Authentic Lomo Effect In 5 Steps
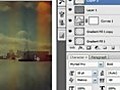
This is a guide - I encourage you to experiment and tweak the effects to suit your own tastes. You’ll learn more by doing that, than from any tutorial.  1, Less contrast (optional really - i think the final effect is better with less contrast but it's not necessary and can be turned off later) 2. Creating a vignette 3. Editing the colour with Curves - editing the channels individually for more vintage colours 4. Importing old paper texture - gives the image a warmer, more tactile feel 5. Creating Light Leaks - my favourite feature of lomographic photos, this technique can look very authentic with more tweaking and experimenting with colours and blend modes I use Photoshop CS3 in the video, but it should be almost exactly the same since version 7 (with the exception of the Shadow/Highlight tool, but that's an optional step). Created with VirtualDub, CamStudio, Audacity and Photoshop CS3
Video Length: 390
Date Found: February 16, 2007
Date Produced: March 03, 2007
View Count: 1
|
|
|
|
|
I got punched by an old guy, for farting near his wife. Read MoreComic book creator Stan Lee talks the future of the medium in the digital age. Panelists Zachary... Read MoreThe U.S. launch of Spotify is still on music lovers' minds. Join Zachary Levi, from NBC’s... Read MoreTuesday: Rupert Murdoch testifies before Parliament on the hacking scandal that brought down "News... Read MoreAfter a long slump, the home construction industry may be showing signs of life. But as Bill... Read More | 1 2 3 4 5 |
|
|
|